
Is Sagat the final boss in I Wanna Test The Game?
Sagat ends the main Beta Test / Stage 6 clear. An optional secret boss (Zenithega) exists after buying Third Eye and re-entering the arena route.

I Wanna Test The Game Sagat guide: how to beat Level 6, fireball crouch-parry vs unparryable uppercut, phase tells, and shop gun prep before the arena.
Level 6 Sagat arena — fireballs, uppercuts, Tiger lines, then the clear.
~7 min read
Sponsored

I Wanna Test The Game Sagat is the Stage 6 / Level 6 boss — a Street Fighter–inspired arena clear that ends the main Beta Test path. This page is the practical how to beat Sagat kit: prep, Situation→Action answers, phase pressure, and the one drill that stops panic crouch. Verified August 16, 2026 · Place 11684369582 · Play on Roblox · Discord.
| Fact | Detail |
|---|---|
| Game | I Wanna Test The Game · Project I Wanna |
| Platform | Roblox |
| Boss | Sagat — Level 6 / Stage 6 arena |
| Core tools | Pistol (Q/E) · timed crouch parry · double jump · Retry |
| Hard rule | Uppercut = jump; fireball = timed crouch — never hold crouch early |
| Modes | Easy / Normal / Bloxxer (harder Sagat + fewer checkpoints) |
| After clear | Winner area · optional Zenithega via Third Eye |
| Status | Beta Test · Project I Wanna · Place 11684369582 |
Cold-entering Stage 6 with a Level 1 pistol is how the Sagat fight turns into a retry loop. Spend Souls first, then walk in.
Red-pipe shops sell pistol upgrades and other arsenal pieces. Farming Souls earlier in the run is cheaper than learning Sagat with a weak Level 1 gun. Full buy order lives on shop and weapons.
Boss deaths are fine if Retry returns you to the arena entrance save. If Retry dumps you into Maze of Doom again, you skipped a crouch-save — fix that on how to save before you blame the Level 6 boss.
Before the cutscene commits you, confirm pistol is selected (not an empty hand), camera is readable without Shift Lock, and you know which face button is crouch on your device. Opening the Sagat fight mid-swap is a free first death.
With prep locked, the next section is the Situation→Action table that actually wins the fight.
Treat every Sagat tell as a binary: parry window or jump window. The table below is the mid-page executable block — memorize rows, not paragraphs.
| Situation | Action | Do not |
|---|---|---|
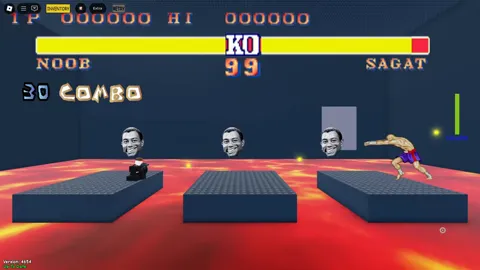 Fireball / Tiger Wave inbound Fireball / Tiger Wave inbound | Timed crouch parry just before impact | Hold crouch early — hold does not parry |

| Uppercut wind-up / rising hit | Jump or double-jump over the arc | Crouch — uppercut is unparryable |
| Tiger rush / dash pressure | Read stop vs commit, then jump clear or create space | Stand mid-lane hoping the rush whiffs |
| Tiger Knee / low advance | Edge stand, then hop to the next safe platform | Center camp while the knee closes distance |
| Sanic-style projectile spam | Track direction → jump lanes or timed parry if the hit is late | Freeze in place and mash shoot only |
| Quiet recovery after a string | Shoot with the pistol, then reset spacing | Greed a full magazine into the next uppercut |
Community clips label tiger / Tiger Wave patterns throughout the Sagat fight. The answer matches the global parry rule: crouch right before the hit lands. Holding crouch from across the arena fails. Full timing notes: parry guide.
Longplay callouts and community walkthroughs agree: Sagat’s uppercut cannot be parried (same family as Rocket Noob kicks — unparryable). If you see the rising tell, commit to jump / double jump. Crouch here is a free death.
Tiger rushes and knee advances punish players who stand still to aim. Sanic-style spam (version-dependent) adds projectile clutter — move first, shoot second. Pattern names and counts have changed across updates, so trust the animation, not a memorized wave count from an old clip.
Once single answers stick, layer them onto phase pressure below.
Matched by build plan, shared topics, and guide progression — not random related links.
Sagat is multi-phase. Exact HP thresholds and Tiger Wave counts shift by version — use this as a pressure map, then verify live.
| Phase feel | What changes | Player job |
|---|---|---|
| Opening | Readable fireballs / rushes; more room to miss | Prove fireball parry + one uppercut jump before greed DPS |
| Mid pressure | Faster strings; fewer free aim pockets | Shoot only on recovery; never skip the jump answer |
| Low HP / late | Messier projectile clutter; quicker transitions | Stay mobile, bank small damage, refuse panic holds |
Older patches changed Tiger Wave counts, second-phase conversion, attack speed, hitboxes, and death VFX. If a year-old clip disagrees with what you see in I Wanna Test The Game today, trust the live tell. Re-check after major combat updates.
Boss intro cutscenes may hide your character briefly. On busy servers, other players can look restricted during the fight. Solo practice still uses the same Situation→Action rows — ignore other avatars when you learn.
If answers work in isolation but you still die on combo pressure, run the drill section next.
Do not “try to clear” until the two core answers are automatic. Split attempts into drills, then clear attempts.
After each death, name the Situation that killed you (fireball hold / uppercut crouch / rush standstill). That one line stops ten identical deaths. Then press R / Retry — do not soft-reset the whole Beta Test.
Default to a side platform or edge stand so uppercuts have a clear jump lane. Center-floor camping looks brave and dies to knees and rushes. Take two or three clean pistol hits on recovery, then re-center your feet before the next tell.
If two attempts die to the same wrong answer, leave, buy one more gun level if you can afford it, warm parry on a safer enemy, then return. The Level 6 boss is a teacher; tilting with a Level 1 pistol is optional.
Once Sagat falls, you are not done with the site path — Winner first, then the optional secret fork.
Clearing I Wanna Test The Game Sagat finishes the main Beta Test clear into the Winner area. The optional secret boss is a separate purchase path.
Winner is the intended end of the Stage 1–6 path. The optional Zenithega secret boss needs the Third Eye shop purchase before you re-enter the Sagat arena route — details on secret boss.
Sagat ends the main Beta Test / Stage 6 clear. An optional secret boss (Zenithega) exists after buying Third Eye and re-entering the arena route.
Yes. Equip the pistol with Q/E (or bumpers) and shoot. Level 2–3 upgrades from red-pipe shops make the Level 6 boss much shorter.
No. Fireballs / Tiger Waves can be timed crouch-parried. Uppercuts cannot — jump or double-jump. Holding crouch early fails even on parryable hits.
Same Situation→Action answers, but expect fewer checkpoints, fewer Souls, and higher boss HP. Bank better gun upgrades and save more often before the arena.
Stage 6 — Vs. Sagat, after Maze of Doom (Stage 5). Use the walkthrough if you still need Stage 1–5 trap notes before the arena.
First clears vary widely by gun level and parry comfort — treat it as a multi-attempt lab, not a one-and-done. Higher pistol levels shorten the HP bar; wrong answers (held crouch, jumped fireballs) lengthen it.
Matched by build plan, shared topics, and guide progression — not random related links.